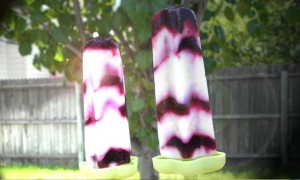
 These creamy yogurt pops are a treat, especially on those hot summer days when you need something refreshing. Adults and kids of all ages love these healthy frozen yogurt popsicles. You can feel good about giving them something that’s “good” for them…they are a delicious sugar-free and grain-free treat.
You can make these pops using other berries based on the same berry sauce recipe, try raspberries, strawberries, etc.
- 1 1/2 cups yogurt cheese (see instructions below)
- 1/2 batch homemade blueberry sauce, cooled (about 3/4 cup)
- NuNaturals Pure Liquid™ Vanilla Stevia™
You will also need:
Popsicle Mold, like this one
OR paper cups and wooden popsicle sticks
Homemade Yogurt Cheese
- Line a strainer with a double layer coffee filter or a kitchen towel or multiple layers of cheesecloth.
- Place strainer over a bowl. It should be sized so that the strainer sits on the lip of the bowl and does not touch the bottom of the bowl.
- Pour plain yogurt, preferably homemade, into the lined strainer and allow to drain for several hours, to overnight. I place mine in the refrigerator and allow it to drain all night long. (The amount of yogurt drained in the end will be reduced by about half, so for this recipe you’ll want to drain at least 3 cups of yogurt.)
The thickened yogurt left in the strainer is your “yogurt cheese”, use as directed in above recipe. It’s also a good cream-cheese type substitute and can also be used as a fruit dip.
The liquid remaining in the bowl is whey. Pour this whey into a jar, cover with lid, and keep in fridge for up-to 6 months. You can use this in lacto-fermenting and so on.
Mix drained yogurt (yogurt cheese) with vanilla stevia, sweetening to taste (about 30 to 40 drops).
In popsicle molds, or paper cups, alternate layers of blueberry sauce and yogurt cheese. Tap gently on the counter after each addition to get rid of air bubbles. Continue until molds are full, leaving 1/4 to 1/2-inch space from the top for expansion.
Place molds in freezer for at least 4 hours, overnight is better. (If using paper cups, place wooden sticks in the center of pops after they are partially frozen.)
Serve with a smile and enjoy!
Amount made varies due to size of popsicle molds.
* Sugar-Free / Grain-Free
 Email To A Friend
 Print This Page


Your pops look so cool! Love that layered look.
This sounds delicious. Curious…If I make yogurt cheese several times before I use up the stored whey from the first batch, can I keep adding new whey to the existing jar, or should I store them separately?
I would say you can do this at least a few times safely. You just don’t want to do it indefinitely, as any “really” older whey could make the whole batch of whey go bad. But probably a couple of months adding to the jar should be okay.
If you’ve got a lot of whey, add a little to shakes or smoothies for a probiotic and protein boost.
I’ve even made “whey” popsicles before. Adding some lemon juice to it for flavor and a little stevia for sweetness. Throw in some raspberries, they’ll float throughout and be suspended in the popsicle. You’ll have a very refreshing treat that’s especially good post workout or after working in the garden.